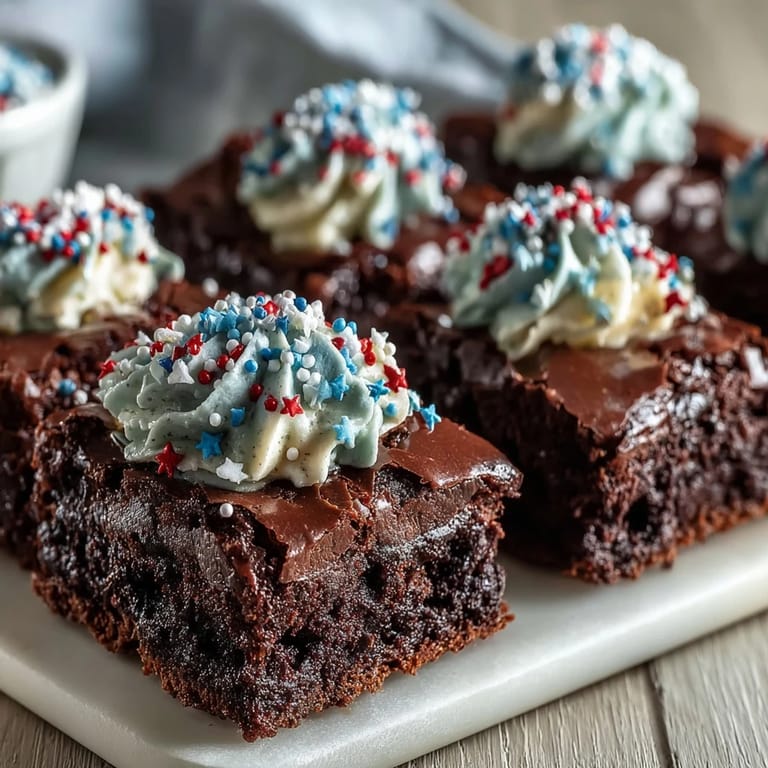
 Save on Pinterest
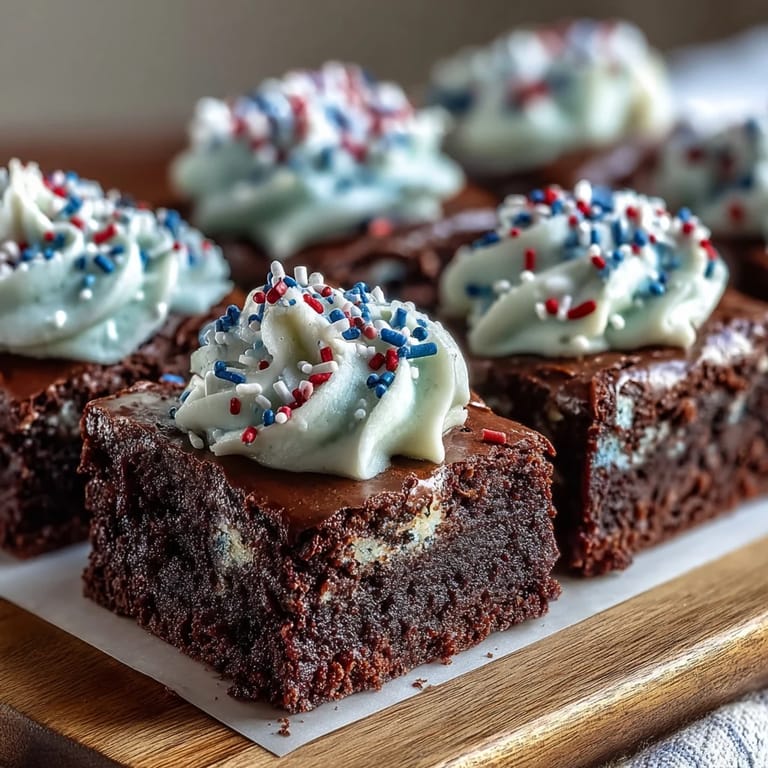
 My neighbor showed up at our door on the Fourth of July with a tin of these brownie bites, and within seconds I understood why she'd been grinning mysteriously all morning. One bite and I was hooked—fudgy, rich chocolate meeting tangy cream cheese frosting, finished with a patriotic pop of color. That same week I had to make my own batch for a barbecue, and I learned that these little gems are somehow both easier and more impressive than they have any right to be. The kitchen smelled like chocolate, my hands got sticky from frosting, and my kids went absolutely wild decorating them with sprinkles. Now they're my go-to when I want something that feels special without the fuss.
I made these for a small gathering last summer and forgot to frost them until guests were already arriving. In a minor panic, I piped the frosting on straight from the bag while someone distracted everyone with stories by the grill. By the time people came inside, every single bite had been decorated with sprinkles, and honestly, that rushed moment turned into the most fun part of hosting. Someone asked for the recipe before they'd even finished their first one, and I realized these little bites had somehow become the memory everyone would talk about.
Ingredients
- Unsalted butter: Use softened butter for the frosting so it blends smooth and creamy, but melted for the brownie base to help the sugar dissolve evenly.
- Granulated sugar: This dissolves into the batter and creates the tender crumb—don't skip it or substitute with brown sugar if you want them light and fudgy.
- Large eggs: They bind everything together and add structure, so use room temperature eggs for the smoothest batter.
- Unsweetened cocoa powder: The real chocolate flavor lives here, so invest in decent quality if you can—it makes a noticeable difference.
- All-purpose flour: Keep your hand light when mixing so you don't overwork the batter and end up with tough brownies.
- Cream cheese: This is what makes the frosting tangy and special, cutting through the sweetness in the best way possible.
- Powdered sugar: Sift it before mixing if you have lumps, or just beat it longer until everything comes together silky smooth.
- Red, white, and blue sprinkles: These aren't just decoration—they're the whole point on the Fourth of July, so don't be shy with them.
Tired of Takeout? 🥡
Get 10 meals you can make faster than delivery arrives. Seriously.
One email. No spam. Unsubscribe anytime.
Instructions
- Set your stage:
- Preheat your oven to 350°F and either grease your mini muffin pan with a little butter or nestle in paper liners. This small choice matters—liners make cleanup easy and help the brownie bites hold their shape.
- Melt and combine:
- Microwave the butter until completely melted, then stir in the sugar, eggs, and vanilla until everything looks smooth and incorporated. You'll notice it smells amazing at this point, which means you're doing it right.
- Fold in the chocolate magic:
- Add the cocoa powder, flour, salt, and baking powder and stir just until you don't see any streaks of flour anymore. Stop here—overmixing creates tough brownies, and you want them tender and fudgy.
- Fill with care:
- Spoon the batter into each cup until it reaches about three-quarters full, leaving a little room for them to rise. A small ice cream scoop makes this step faster and more even.
- Bake until perfect:
- Bake for 12 to 15 minutes, checking at 12 by inserting a toothpick in the center. You want to see a few moist crumbs—not wet batter, but definitely not completely clean, because that means you've baked past fudgy.
- Cool strategically:
- Let them sit in the pan for 5 minutes so they firm up enough to handle, then transfer to a wire rack. This prevents them from sinking in the middle while they continue cooking gently from residual heat.
- Make the frosting:
- Beat the softened cream cheese and butter together until light and creamy, then gradually add the powdered sugar and vanilla. Once it looks fluffy, add milk a tablespoon at a time until it's spreadable but still holds its shape.
- Decorate with joy:
- Once the brownie bites are completely cool, pipe or dollop frosting onto each one—this is where you can get creative with how much or how little you use. Finish with sprinkles and sparklers, then step back and admire what you've made.
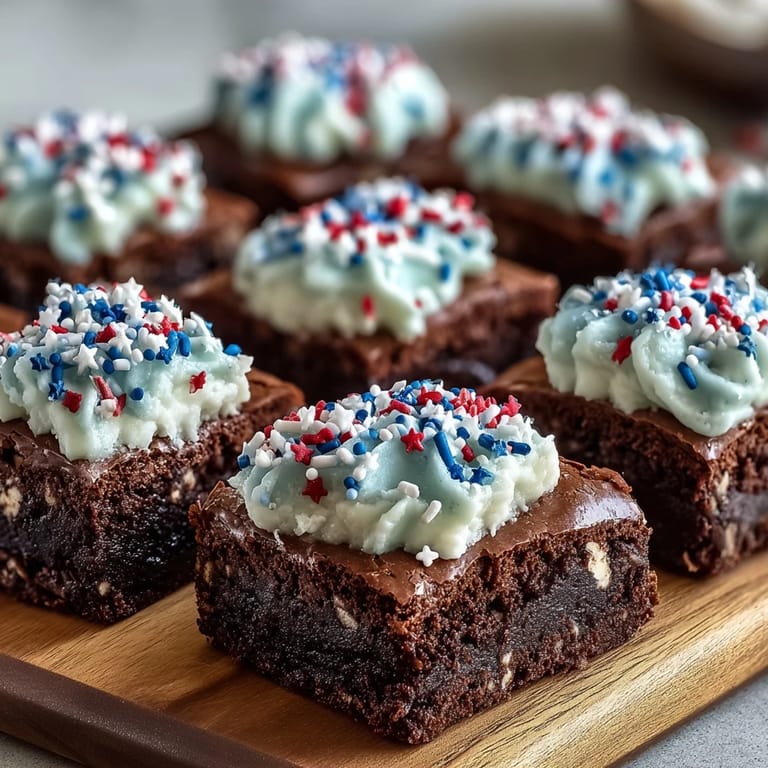
 Save on Pinterest
 These brownie bites became the unexpected star at a birthday party I hosted last month, not because they were fancy, but because kids and adults kept circling back to them. I watched someone pick one up, taste it, and then immediately thank me—that simple moment of someone genuinely enjoying something you made is why I keep coming back to this recipe.
The Art of Not Overbaking
I learned this lesson the hard way by pulling out a batch that looked pretty from the outside but tasted dry inside. Now I use the toothpick test religiously and always aim for that happy middle ground where the center still has some moisture. The scary part is that they keep cooking for a minute or two after you pull them from the oven, so when in doubt, take them out five seconds early rather than five seconds late.
Frosting Consistency Matters More Than You Think
Too stiff and it tears the delicate brownie as you spread it; too soft and it just slides off onto the plate. Finding that sweet spot by adding milk gradually is the trick I wish I'd learned before my first attempt, when I ended up with a frosting that was basically whipped butter soup. Now I add just enough milk to make it spreadable but still hold a peak when you lift the back of a spoon.
Making Them Your Own
The base recipe is solid, but these bites are really a canvas for whatever festive vibe you're going for. Swap the sprinkles for edible glitter if you want something more elegant, or try pop rocks for a fun crunch that surprises your mouth. You could even dust the finished bites with a little cocoa powder if you want to lean into the chocolate even more instead of going full candy store with decorations.
- Make them ahead by freezing unfrosted bites in an airtight container for up to two weeks, then frost them fresh on serving day.
- A piping bag with a small round tip gives you more control than spreading and looks noticeably fancier with minimal extra effort.
- If you can't find mini muffin pans, regular muffin pans work too—just adjust the baking time up to 18 to 20 minutes and expect fewer, larger bites.
 Save on Pinterest
 These brownie bites have a way of turning ordinary moments into celebrations, whether it's the Fourth of July or just a Tuesday when someone needs a little chocolate happiness. Make them, decorate them however makes you smile, and watch what happens.
Recipe FAQs
- → How do I achieve a fudgy texture in these brownie bites?
Use a balance of butter and cocoa powder and avoid overmixing the batter to keep the brownies dense and moist.
- → Can I make the frosting dairy-free?
Substitute cream cheese and butter with plant-based alternatives to create a dairy-free version of the frosting.
- → What is the best way to decorate the brownie bites?
Once cooled, spread or pipe the cream cheese frosting and top with red, white, and blue sprinkles for a festive finish.
- → How long should the brownie bites cool before frosting?
Allow the brownie bites to cool completely on a wire rack for about 30 minutes to an hour to ensure the frosting adheres well.
- → Can I prepare these in advance?
Yes, store the baked bites un-frosted in an airtight container in the refrigerator for up to 3 days; frost just before serving.